Basics
Box Modeling
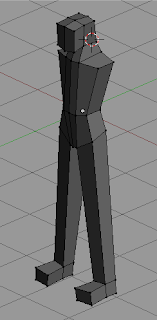 Box modeling is a simple method of modeling which focuses on manipulating primitive shapes to give a rough view of the intended model. This is used in a number of different areas and is quite similar to the beginning of an anatomical concept drawing in which simple shapes will be used to construct a basic human/animal figure and can then be added to with details and more complex shapes, this being very much the same concept as Box Modeling. (An example of Box Modeling in the free application "Blender" to the right).
Extrusion Modeling
Extrusion is where you "drag" an area of an object such as a face of a cube to create an extension of the model. This is practically converting a 2 dimensional shape (The face of the cube) into a 3 dimensional shape (A new cube attached to the model). This is very useful when creating bodies and other models that consist of a cluster of similar shapes that just need to be tweaked slightly especially human faces/heads. (Below is an example of a shape being extruded taken from a free online tutorial http://www.escalight.com/tutorials/3dsmax-tutorials/gundam-rx-78-2-modeling-arm-part-1.html))
Vertices
A vertex is the point of an intersection or corner of a geometric shape. In 3D modeling this can be manipulated into different position while staying connected to the edges of the shape, consequently dragging the edge with it as it is moved. Vertices are generally used in all forms of modeling due to the impact they have by completely altering the geometry of the shape.
Polygons
A polygon is created when 3 or more vertices are connected via a line creating a face which is then referred to as a polygon.
Tutorial
Box Modeling
 Box modeling is a simple method of modeling which focuses on manipulating primitive shapes to give a rough view of the intended model. This is used in a number of different areas and is quite similar to the beginning of an anatomical concept drawing in which simple shapes will be used to construct a basic human/animal figure and can then be added to with details and more complex shapes, this being very much the same concept as Box Modeling. (An example of Box Modeling in the free application "Blender" to the right).
Extrusion Modeling
Extrusion is where you "drag" an area of an object such as a face of a cube to create an extension of the model. This is practically converting a 2 dimensional shape (The face of the cube) into a 3 dimensional shape (A new cube attached to the model). This is very useful when creating bodies and other models that consist of a cluster of similar shapes that just need to be tweaked slightly especially human faces/heads. (Below is an example of a shape being extruded taken from a free online tutorial http://www.escalight.com/tutorials/3dsmax-tutorials/gundam-rx-78-2-modeling-arm-part-1.html))
Vertices
A vertex is the point of an intersection or corner of a geometric shape. In 3D modeling this can be manipulated into different position while staying connected to the edges of the shape, consequently dragging the edge with it as it is moved. Vertices are generally used in all forms of modeling due to the impact they have by completely altering the geometry of the shape.
Polygons
A polygon is created when 3 or more vertices are connected via a line creating a face which is then referred to as a polygon.
Tutorial
The first task is to create the base which is comprised of 2 parts - A cylinder and a cube.
The cylinder must be inserted first (image 1) then the cube which must be transformed into some sort of rectangular cuboid and added to the cylinder (image 2)
Next you need to add a cube to the top of the cylinder (Image 3). This will function as the base hinge for the arm. After that you must add in the first part of the arm with part of it connected to the hinge (Image 4).
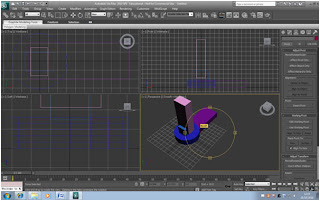 The next part of the arm is then added to the top (Image 5) and then the "hand" is added to the previous part (image 6).
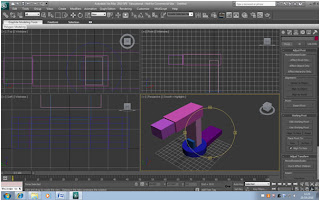 Next the last part of the arm needs to be modified to give a better idea of the final shape. This is done by selecting "modify" and right clicking the object in the list and changing it to an editable poly. Then select vertex (or "1" as a hotkey) and highlight the 4 vertexes at the end of the cube and scale it, similar to the cube shown in Image 7. Afterwards you need to start rotating the parts to give it a better shape. Modify the pivot and drag it to the base of the arm inside the hinge. This will cause to arm to rotate at that point. Then rotate that part of the arm about 20-30 degrees.
Rotate the last part of the arm to join up with the rest. Move the hand in place too (Image 9). Then afterwards with everything that you already know, you can make the arm look how you want until you are comforable with it. You should also rotate the "hand" to fit the rest of the model as I've done (Image 10).
I made additions to the base for detail. This included adding some shapes such as cylinders. I also curved the hinge for detail and added a sphere which then split into two alves to form the joints for the arm around the hinge (Image 11). Then to make it easier to edit, we copy the last part of the arm and turn it into an "instance copy". Then copy the hinge and drag two copies to the instance to give the arm more shape. Using the "Attach" option to attack object to the instance, will make them appear on the main model (Image 12).
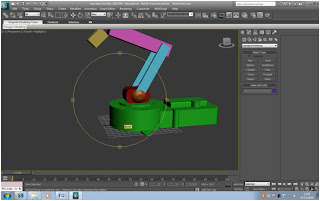
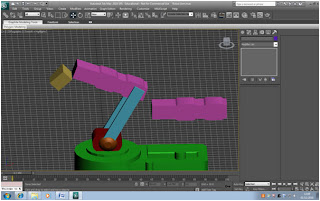 Then the sphere must be copied to create another joint just like the one around the hinge (orange sphere). Then 2 raised planes should be added above and below the second arm. Then selecting the vertexes, the middle sections of the planes should be dragged in towards the arm to form an indent. More joints were added and then a cylinder with two more flat planes stretching between the cylinder and the last arm. The hand is then connected to the cylinder by two cube that have been flattened to fit onto the sides of the cylinder.
Using two cubes for the hand, the "jaws" are then made with 2 cylinders between the jaws and the main hand section acting as joints. Then yet another 2 cubes edited to form the "pincers" at the end of the jaws again separated from the jaws with cylinder joints.
The basic low-poly model is now finished. I added a few finished touches (changed to colour) to make it feel more metallic.


No comments:
Post a Comment